
Welcome back to the second part of our machine learning project initiation series! In the first article, we had a quick refresher of CRISP-DM, and I promised we’d start with the first phase – but hold on, let’s backtrack a bit.
- Environment
- Business Understanding
- Data Understanding
- Data Preparation
- Modeling
- Evaluation
- Deployment
Setting the Stage for Success
Before we jump into the first phase, let’s talk about something foundational – the environment often gets overlooked but is crucial for a smooth project journey. Imagine this as the backstage preparation before the great performance. It’s about fixing the variables that will influence your entire project. While you may not have complete control from the get-go, swift decisions on your project’s environment can be crucial. Consider these key factors:
- Operating System (Linux, macOS, MS Windows)
- Development environment (VS Code, PyCharm, Spyder, …)
- Programming language (Python, R, Scala, Java, C++…)
- Version (Python 3.9, 3.10, 3.11, 3.12, …)
- ML/DL framework
- Decide on a framework and keep an eye on active and legacy options.
- Active frameworks: TensorFlow, Keras, PyTorch, TensorFlow.js, Scikit-learn, Torch, Caffe,
- Legacy frameworks: Theano, MXNET, MS Cognitive Toolkit, …
- Decide on a framework and keep an eye on active and legacy options.
- Virtual environment (venv, pipenv, Anaconda, conda, …)
- Hardware Acceleration:
- Consider CPU-only vs. GPU support, especially if your project involves resource-intensive tasks.
- Folder structure in your repository
- Define a clear structure in your repository to ensure organization, maintenance, and collaboration.
This list might not cover everything, but it’s a solid starting point. Each decision here could ripple through your project, so it’s wise to address them early on.
Consider the Operating System Influence
While the operating system may not dictate your success, it can play a role. Choose the one where you’re most comfortable. Most development environments are versatile enough to cater to Windows, macOS, or Linux users. However, if your project involves GPU support with a specific framework, that’s where things get interesting.
Programming Languages for ML
There is a variety of programming languages you can use for your ML project. The list below is far away from complete, but it gives a first impression. Here you can find more languages.

For this series, I will focus on Python, as it would otherwise be too complex to explain all the details. It would also go beyond the scope of this and subsequent articles. At this point, I would just like to show the variety of possibilities. The advantages and disadvantages of the respective languages are not part of this series. You can easily find resources in the web like here.
GPU in the Spotlight
For those eyeing GPU support, especially for machine learning frameworks like PyTorch and TensorFlow, it’s essential to know that GPU support might have OS limitations. PyTorch with GPU support? Works on Windows and Linux. TensorFlow with GPU support? Primarily limited to Linux, with Windows users needing to leverage WSL (Windows Subsystem for Linux).
In a previous article, I guided you through setting up an Ubuntu 22.04 client with GPU support, sharing insights from comparing CPU-only versus GPU-supported model training. Spoiler alert: You don’t need the latest NVIDIA graphic model; I’ll show you how to rock it with an NVIDIA GeForce GTX 1050 Ti (4GB VRAM), CUDA 12.3, and cuDNN 8.9.7. Even with this configuration, I was able to achieve a speed-up factor of 23. With a current NVIDIA model, this factor is likely to be even more impressive.
For more information about installing CUDA on Linux, please checkout the official NVIDIA documentation NVIDIA CUDA Installation Guide for Linux. If you plan running CUDA on MS Windows that’s your guide. You’ll also need NVIDIA’s cuDNN – have a look at this documentation.
Structuring your GitHub repository
A clean folder structure in your repository is key for collaboration but also for maintenance.
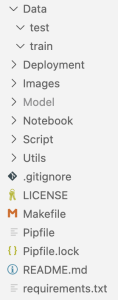
At the moment I’m still trying out a few options. I have included a picture from my last project as an example. I’ve used the Data folder to separate train and test data (and data for validation). The Deployment folder contains everything that is needed to deploy your model. Remember: Only an applied model is a good model; everything else is useless. Ensure that you deploy your model. I’ve put every image that used for documentation on readme files into the Image folder and in the Model folder you can find model files like *.h5, *.tflite, models in saved_model format, or *.sav files. The Notebook folder I use for Jupyter notebook files to do some preparation steps, EDA, model training and tuning. To train the final model I use Python files that are saved in the Script folder. Sometime I also use some utility functions – those files are saved in the Utils folder.
I have made the habit of working with a Makefile. I often use it to create my Python environment in my project folder (at least under Ubuntu this works very well). That way I always have everything together and a better overview. If I delete the project folder, I can’t forget to delete the environment as well. You don’t have to do it this way. However, it has proved to be very helpful for my workflow. The first lines in my Makefile often look like this:
export PIPENV_VENV_IN_PROJECT := 1
export PIPENV_VERBOSITY := -1

environment:
	@echo "Building Python environment"
	python3 -m pip install --upgrade pip
	pip3 install --upgrade pipenv
	pipenv install --python 3.9
In my last project, I even used it to create a folder structure. That’s why I added a few lines to the Makefile.
export PIPENV_VENV_IN_PROJECT := 1
export PIPENV_VERBOSITY := -1

environment:
	@echo "Building Python environment"
	python3 -m pip install --upgrade pip
	pip3 install --upgrade pipenv
	pipenv install --python 3.9
	$(shell mkdir -p Model)
	$(shell mkdir -p Data)
	$(shell mkdir -p Data/train)
One command is then sufficient to set up the environment, including installing the dependencies: make environment
But you can also find templates on the Internet. Most of them you can use as they are or slightly modified. On GitHub I’ve found this and this template.
There are even tools that can be used to automatically generate a directory structure. One of these tools is called cookiecutter. I found a simple guide here. I haven’t used it myself yet. The next project would certainly be a good opportunity to give this tool a chance.
Choosing Your Starting Point
Now, with the environment sorted, let’s talk about where to kick off your project. If you’re on a mission to solve a (business) problem, head to Business Understanding. But if you’re here to explore a dataset and indulge in some machine learning magic, start with Data Understanding.
The Dataset Dilemma
And for those embarking on an ML course project if you’re on the hunt for the perfect dataset, here’s a nugget of wisdom: Don’t spend an eternity searching. Trust me, it doesn’t have to be perfect – your ability to extract insights and patterns matters more. Find something interesting, start at Data Understanding, and maybe think about a fictional business problem to solve.
Tips and Best Practices
- Virtual Environment Mastery: When working on collaborative projects, consider using virtual environments like
venvorcondato manage dependencies. This helps ensure consistent environments across team members and it is also very helpful in case of peer reviews. - Version Control Discipline: Embrace version control systems like Git from the early stages. Regularly commit your code and create branches for different features or experiments. This fosters collaboration and provides a safety net for experimentation.
- Clear Folder Structures: Organize your project repository with a clear and intuitive folder structure. Categorize code, data, documentation, and models separately. This not only streamlines collaboration but also simplifies project navigation.
- Documentation Habits: Cultivate the habit of documenting your code, assumptions, and decisions. A well-documented project is not only easier to understand but also facilitates knowledge transfer, especially when revisiting the project after some time.
- Continuous Learning: Stay updated with the latest developments in the ML/DL field and the frameworks you’re using. Regularly invest time in learning new techniques, as this can significantly impact the success of your project.
What’s next?
Stay tuned for the next chapter, where we finally plunge into the heart of CRISP-DM’s first phase – Business Understanding. Until then, remember: Your environment sets the stage, and the journey ahead promises excitement and discovery. Stay curious!
