
TensorFlow with GPU support on Ubuntu
This article is about how to use GPU support when using TensorFlow on Ubuntu 22.04. I found several manuals how to install NVIDIA’s Toolkit and cuDNN but there was no manual that was completely helpful for my case. I describe here the process for a normal Intel based PC with NVIDIA GeForce GTX 1050 Ti (4GB VRAM) which is quite old but anyway the effect is great.
Install NVIDIA driver and CUDA Toolkit
wget https://developer.download.nvidia.com/compute/cuda/repos/ubuntu2204/x86_64/cuda-ubuntu2204.pin
sudo mv cuda-ubuntu2204.pin /etc/apt/preferences.d/cuda-repository-pin-600
wget https://developer.download.nvidia.com/compute/cuda/12.3.1/local_installers/cuda-repo-ubuntu2204-12-3-local_12.3.1-545.23.08-1_amd64.deb

sudo dpkg -i cuda-repo-ubuntu2204-12-3-local_12.3.1-545.23.08-1_amd64.deb
sudo cp /var/cuda-repo-ubuntu2204-12-3-local/cuda-*-keyring.gpg /usr/share/keyrings
sudo apt-get update
sudo apt-get -y install cuda
echo 'export PATH=/usr/local/cuda-12.3/bin${PATH:+:${PATH}}' >> ~/.bashrc
echo 'export LD_LIBRARY_PATH=/usr/local/cuda-12.3/lib64${LD_LIBRARY_PATH:+:${LD_LIBRARY_PATH}}' >> ~/.bashrc
source ~/.bashrc
To check that everything is fine, reboot the machine and type
nvidia-smi
Install cuDNN
Next thing to do is, we need to install cuDNN. You can download it here. But you need to create an account before you can download the library.

cudnn-local-repo-ubuntu2204-8.9.7.29_1.0-1_amd64.deb
Like Alexey describes in the video, I moved this file to the bin folder in my Home folder. Then the next steps.
cd var/cudnn-local-repo-ubuntu2204-8.9.7.29/
sudo gdebi libcudnn8_8.9.7.29-1+cuda12.2_amd64.deb
sudo gdebi libcudnn8-dev_8.9.7.29-1+cuda12.2_amd64.deb
sudo gdebi libcudnn8-samples_8.9.7.29-1+cuda12.2_amd64.deb
Testing
I think it wouldn’t be a good manual without having a benchmark. How much faster the trainings run on GPU comparing to the same hardware but only using CPU?
Testing scenario
Both scenarios were running on the same host machine with the following specs:
- Intel(R) Core(TM) i7-4790 CPU @ 3.60GHz
- NVIDIA GeForce GTX 1050 Ti (4GB VRAM)
- 16 GB RAM
- 256 GB SSD
For the training I used this code for both scenarios.
def make_model(train_generator, learning_rate=0.001, dropout_rate=0.5):
    input_size=299

    base_model = keras.models.Sequential()
    classes = len(list(train_generator.class_indices.keys()))

    inputs = keras.Input(shape=(input_size, input_size, 3))
    base = base_model(inputs)

    ###############################################################

    # Stack of convolutional layers and pooling layers
    conv_1 = keras.layers.Conv2D(filters=32, kernel_size=(3, 3), activation='relu',)(base)
    vectors_1 = keras.layers.MaxPooling2D(pool_size=(2,2))(conv_1)
    conv_2 = keras.layers.Conv2D(filters=64, kernel_size=(3, 3), activation='relu',)(vectors_1)
    vectors_2 = keras.layers.MaxPooling2D(pool_size=(2,2))(conv_2)
    conv_3 = keras.layers.Conv2D(filters=128, kernel_size=(3, 3), activation='relu',)(vectors_2)
    vectors_3 = keras.layers.MaxPooling2D(pool_size=(2,2))(conv_3)

    # Flatten Layer
    flatten = keras.layers.Flatten()(vectors_3)

    # Fully Connected Layers
    dense_1 = keras.layers.Dense(256, activation='relu')(flatten)
    drop_1 = keras.layers.Dropout(dropout_rate)(dense_1)
    dense_2 = keras.layers.Dense(128, activation='relu')(drop_1)
    drop_2 = keras.layers.Dropout(dropout_rate)(dense_2)

    # Output Layer
    outputs = keras.layers.Dense(classes, activation='softmax')(drop_2)

    ###############################################################

    model = keras.Model(inputs, outputs)

    optimizer = keras.optimizers.Adam(learning_rate=learning_rate)
    loss = keras.losses.CategoricalCrossentropy()

    model.compile(
        optimizer=optimizer,
        loss=loss,
        metrics=['accuracy']
    )

    return model
def get_ImageDataGenerators():

    train_gen = ImageDataGenerator(
        rescale=1./255,
    )

    train_generator = train_gen.flow_from_directory(
        './../Data/train',
        target_size=(299, 299),
        batch_size=20,
        class_mode='categorical'
    )

    test_gen = ImageDataGenerator(rescale=1./255)

    test_generator = test_gen.flow_from_directory(
        './../Data/test',
        target_size=(299, 299),
        batch_size=20,
        shuffle=False,
        class_mode='categorical'
    )

    return train_generator, test_generator
checkpoint = keras.callbacks.ModelCheckpoint(
    'sequential_final_v1_{epoch:02d}_{val_accuracy:.3f}.h5',
    save_best_only=True,
    monitor='val_accuracy',
    mode='max'
)
train_generator_299, test_generator_299 = get_ImageDataGenerators()

learning_rate = 0.001
droprate = 0.5

model = make_model(
    train_generator=train_generator_299,
    learning_rate=learning_rate,
    dropout_rate=droprate
)

history = model.fit(
    train_generator_299,
    epochs=75,
    validation_data=test_generator_299,
    callbacks=[checkpoint]
)
Results scenario 1 – Running on CPU
Let’s run this code first on CPU. I only show you the first 10 epochs because that shows already the important point. The first epoch needed 374s, the second 239s and the rest is also in that range.
Found 1770 images belonging to 4 classes.
Found 40 images belonging to 4 classes.
Epoch 1/75
89/89 [==============================] - 374s 4s/step - loss: 1.4474 - accuracy: 0.4531 - val_loss: 1.5142 - val_accuracy: 0.2500
Epoch 2/75
89/89 [==============================] - 239s 3s/step - loss: 1.2688 - accuracy: 0.4842 - val_loss: 1.4341 - val_accuracy: 0.2500
Epoch 3/75
89/89 [==============================] - 343s 4s/step - loss: 1.2357 - accuracy: 0.4853 - val_loss: 1.4267 - val_accuracy: 0.3000
Epoch 4/75
89/89 [==============================] - 240s 3s/step - loss: 1.1064 - accuracy: 0.5345 - val_loss: 1.3052 - val_accuracy: 0.3250
Epoch 5/75
89/89 [==============================] - 366s 4s/step - loss: 0.8940 - accuracy: 0.6322 - val_loss: 1.2945 - val_accuracy: 0.3500
Epoch 6/75
89/89 [==============================] - 347s 4s/step - loss: 0.6072 - accuracy: 0.7774 - val_loss: 1.0095 - val_accuracy: 0.6250
Epoch 7/75
89/89 [==============================] - 377s 4s/step - loss: 0.3812 - accuracy: 0.8780 - val_loss: 1.0696 - val_accuracy: 0.5750
Epoch 8/75
89/89 [==============================] - 256s 3s/step - loss: 0.2537 - accuracy: 0.9130 - val_loss: 1.1671 - val_accuracy: 0.5750
Epoch 9/75
89/89 [==============================] - 260s 3s/step - loss: 0.1642 - accuracy: 0.9503 - val_loss: 1.7544 - val_accuracy: 0.4750
Epoch 10/75
89/89 [==============================] - 254s 3s/step - loss: 0.1471 - accuracy: 0.9576 - val_loss: 1.9782 - val_accuracy: 0.6250
Results scenario 1 – Running on GPU
To show you how big is the impact of using the GPU instead of CPU, let’s run the same code again. You can check whether your GPU is working or not. Just type the command nvidia-smi into a terminal.
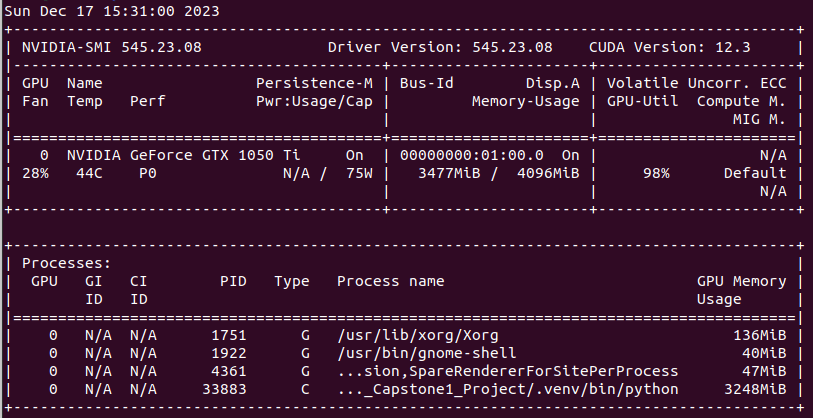
On the screenshot you can see all details that I mentioned before. In the first line you see the driver version and CUDA version. There is also information about the GPU which is an quite old model with 4GB VRAM. Furthermore there is the information about the utilization of the GPU. You can that this training utilizes 3248MiB and the actual GPU-Utilization is 98%. Although the GPU is quite old it should be much more efficient than only using the CPU as seen before.
When we look at the first ten epochs printed below, indeed the machine is much faster than before. It needed between 12 and 15 seconds per epoch. That’s really great I think.
Found 1770 images belonging to 4 classes.
Found 40 images belonging to 4 classes.
Epoch 1/75
89/89 [==============================] - 14s 144ms/step - loss: 1.4772 - accuracy: 0.4582 - val_loss: 1.4222 - val_accuracy: 0.2500
Epoch 2/75
89/89 [==============================] - 12s 130ms/step - loss: 1.2905 - accuracy: 0.4768 - val_loss: 1.4001 - val_accuracy: 0.2500
Epoch 3/75
89/89 [==============================] - 13s 149ms/step - loss: 1.2200 - accuracy: 0.4904 - val_loss: 1.4977 - val_accuracy: 0.3000
Epoch 4/75
89/89 [==============================] - 12s 133ms/step - loss: 1.0840 - accuracy: 0.5525 - val_loss: 1.4384 - val_accuracy: 0.2250
Epoch 5/75
89/89 [==============================] - 13s 143ms/step - loss: 0.8630 - accuracy: 0.6701 - val_loss: 1.5604 - val_accuracy: 0.3500
Epoch 6/75
89/89 [==============================] - 14s 155ms/step - loss: 0.6169 - accuracy: 0.7757 - val_loss: 1.5425 - val_accuracy: 0.3750
Epoch 7/75
89/89 [==============================] - 15s 162ms/step - loss: 0.3618 - accuracy: 0.8763 - val_loss: 1.9675 - val_accuracy: 0.4000
Epoch 8/75
89/89 [==============================] - 15s 163ms/step - loss: 0.2654 - accuracy: 0.9169 - val_loss: 2.1774 - val_accuracy: 0.4750
Epoch 9/75
89/89 [==============================] - 14s 155ms/step - loss: 0.1518 - accuracy: 0.9531 - val_loss: 2.5042 - val_accuracy: 0.5250
Epoch 10/75
89/89 [==============================] - 13s 143ms/step - loss: 0.1728 - accuracy: 0.9554 - val_loss: 2.2911 - val_accuracy: 0.5000
