- How to find the right Cuda version?
- Step 1: Installing CUDA Toolkit
- Step 2: Installing cuDNN
- Step 3: Installing TensorFlow and Requirements
- Step 4: Testing
This part is not discussed in the course ML Zoomcamp, but it could be useful how to setup GPU support for your local machine.
How to find the right Cuda version?
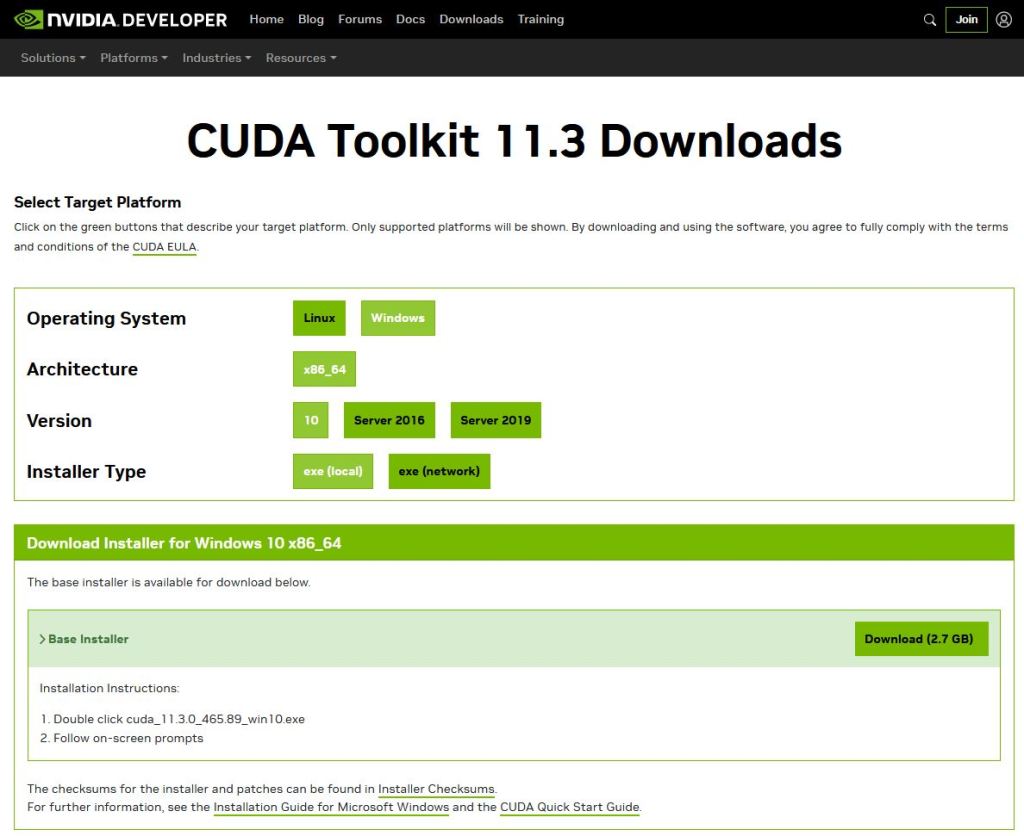
First you need to know which CUDA Toolkit works with your NVIDIA graphics adapter. The easiest way to find out the supported version is to search your adapterin the list on wikipedia (https://de.wikipedia.org/wiki/CUDA). In my case I need Cuda version 10.0-11.3. You can find the version 11.3 for Linux and Windows on NVIDIAs developer page (https://developer.nvidia.com/cuda-11.3.0-download-archive). In this article I want to describe the Windows part.
Step 1: Installing CUDA Toolkit
When installing be careful only to update/install the CUDA software. It can happen that you’ve installed already a newer version of drivers and the other software packages, but the CUDA version has to match with your graphics adapter. The installation can take some minutes. After the installation has finished you can find it here “C:\Program Files\NVIDIA GPU Computing Toolkit\CUDA”.
Step 2: Installing cuDNN
To really use the full potential of your NVIDIA card you need another software library from NVIDIA – the NVIDIA CUDA Deep Neural Network Library (cuDNN). This library provides optimized implementations for operations (specifically for GPUs) that are normally used in neural networks (pooling, convolution, and matrix operations).
But before you can download this package from https://developer.nvidia.com/cudnn you need a free account at NVIDIAs Developer Program. When having already an account at Facebook or Google, you can use that account (didn’t test it).
When download is finished you can find a zip package in your download folder. Now you need to copy some files to your file system.
- cudnn64_8.dll
- from zip folder bin\
- to C:\Program Files\NVIDIA GPU Computing Toolkit\CUDA\v11.3\bin
- cudnn.h
- from zip folder include
- to C:\Program Files\NVIDIA GPU Computing Toolkit\CUDA\v11.3\bin
- cudnn.lib
- from zip folder lib\x64\
- to C:\Program Files\NVIDIA GPU Computing Toolkit\CUDA\v11.3\lib\x64
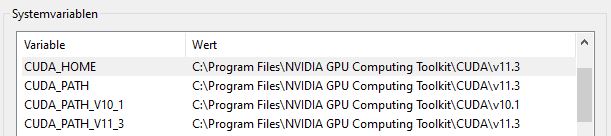
The last step is to check the system variables for CUDA. If there are more CUDA versions installed you have different variables of kind CUDA_PATH_Vxx_y. Check if all point to the same directory (CUDA_HOME, CUDA_PATH, CUDA_PATH_V11_3).
Step 3: Installing TensorFlow and Requirements
Now your Windows machine ready to use TensorFlow with GPU-Support. The installation of TensorFlow is now quite easy and works similar to CPU version. Before we can install tensorflow we need to ensure having installed Microsoft Visual C++ Redistributable for Visual Studio 2015, 2017, and 2019 (https://learn.microsoft.com/de-DE/cpp/windows/latest-supported-vc-redist?view=msvc-170).
Now we can try pip install or pip3 install. But there is an important information from https://www.tensorflow.org/install/pip#windows-native, use tensorflow<2.11 because anything above 2.10 is not supported on the GPU on Windows Native.
pip install "tensorflow<2.11"
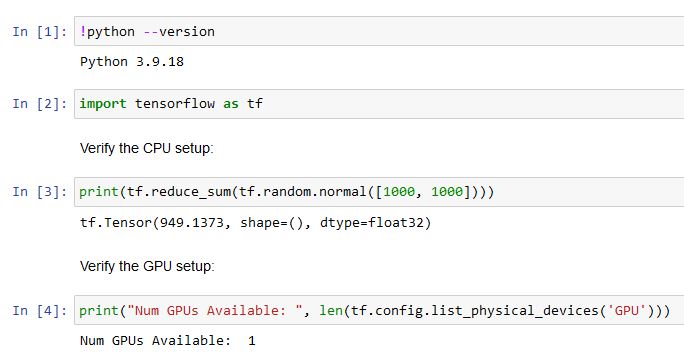
Step 4: Testing
Now just open a new Jupyter notebook an check that everything works fine.